Finding out you need a biopsy in your mouth can be a little unsettling. You might be thinking about the procedure itself, the recovery, and what the results will show. On top of all that, you receive a treatment plan or an insurance claim form filled with numbers and confusing terminology. It feels like you need a decoder ring just to understand what you’re paying for.
One of the most common questions we hear is, “What is the dental code for a biopsy?” It’s a fair question. These codes, specifically the Current Dental Terminology (CDT) codes, are the standardized language dentists and insurance companies use to describe procedures. Understanding them can empower you, remove the mystery from your bill, and help you have more informed conversations with your dental office.
This guide is designed to be your friendly, reliable companion through the world of biopsy dental codes. We won’t just throw a list of numbers at you. We’ll walk through what a biopsy is, why you might need one, the different types, and—most importantly—break down the specific codes associated with each procedure. By the end, you’ll feel confident looking at a treatment plan and understanding exactly what is being proposed.
Let’s demystify this together.
Dental Code for Biopsy
What is an Oral Biopsy? A Gentle Introduction
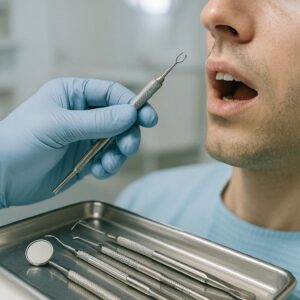
Before we dive into the codes, let’s talk about the procedure itself. An oral biopsy is a minor surgical procedure where a small piece of tissue is removed from your mouth to be examined under a microscope by a pathologist. Think of it as a fact-finding mission. Your dentist or oral surgeon has likely spotted an area in your mouth that looks different or unusual.
Why would a dentist recommend one?
There are several reasons a dentist might suggest a biopsy. They are not always a cause for alarm. Common reasons include:
-
Persistent Sores: Any sore in your mouth that doesn’t heal within two weeks.
-
Suspicious Lumps or Thickening: An unexplained bump or a rough patch on the gums, cheek, tongue, or lips.
-
Red or White Patches: Known as erythroplakia (red patches) and leukoplakia (white patches), these can sometimes be precursors to more serious conditions.
-
Chronic Fungal or Viral Lesions: To confirm a diagnosis for a stubborn infection.
-
Bone Growths: Unusual growths in the jawbone visible on an x-ray.
The goal of a biopsy is to get a definitive diagnosis. It’s the gold standard for determining whether a lesion is benign (harmless), inflammatory, or malignant (cancerous). Knowing exactly what you’re dealing with is the first and most important step toward effective treatment.
The Basic Process: What to Expect
-
Examination: Your dentist numbs the area with a local anesthetic.
-
Removal: The tissue sample is carefully removed using one of the methods we’ll discuss below.
-
Submission: The sample is placed in a special preservative solution in a labeled vial and sent to an oral pathologist.
-
Analysis: The pathologist prepares slides from the tissue and examines them.
-
Diagnosis: A report is sent back to your dentist with the final diagnosis, which they will then discuss with you.
The “Dental Code for Biopsy”: Breaking Down CDT Codes
Now, let’s get to the heart of the matter. When you see “dental code for biopsy” on your paperwork, it isn’t just one single code. It’s a category of codes, each describing a specific technique. These codes are part of the CDT coding system, maintained by the American Dental Association (ADA) and updated annually.
Understanding these codes helps you see how the tissue was removed, which directly impacts the complexity and cost of the procedure. Here are the most common CDT codes you’ll encounter.
D7285: Biopsy of Oral Tissue – Hard (Bone)
This code is used when the biopsy involves hard tissue, meaning bone.
-
When is it used? If your dentist sees an abnormality in your jawbone on an x-ray—perhaps a cyst, a tumor, or an area of unusual density—they may need to take a sample of the bone itself.
-
The Procedure: This is a more involved process. It often requires making an incision in the gum to access the bone, then using specialized instruments to remove a core or a piece of the lesion and surrounding bone. The area is then typically closed with stitches.
-
What it means for you: Because this involves bone, it’s generally considered a more complex surgical procedure than a soft tissue biopsy. Recovery might involve more significant soreness and a longer healing period.
D7286: Biopsy of Oral Tissue – Soft
This is the most common code you’ll see for biopsies in the mouth. It covers the removal of soft tissue samples from areas like the gums, cheek, tongue, lips, and palate.
This code encompasses several techniques for removing soft tissue. The specific method used depends on the size, location, and nature of the lesion.
-
Incisional Biopsy: Only a small portion of the lesion is removed. This is often done for large lesions where the dentist doesn’t want to remove the entire area, just a representative sample for diagnosis.
-
Excisional Biopsy: The entire lesion is removed. This is common for small, well-defined lumps or patches. If the lesion is small and appears benign, removing it entirely can be both diagnostic and curative.
-
Punch Biopsy: A special circular blade, resembling a tiny apple corer, is used to take a small, cylindrical sample of tissue. This is a quick and minimally invasive technique often used for uniform lesions.
D7287: Exfoliative Cytological Sample Collection
This code sounds complex, but the procedure is very simple. It refers to a “brush biopsy” or “scrape biopsy.”
-
The Procedure: Instead of a scalpel, the dentist uses a small, stiff brush to scrape the surface of a lesion, collecting a sample of cells. These cells are then transferred to a slide or a vial and sent to a lab.
-
When is it used? It is often used as a screening tool for visible lesions that appear less suspicious. It’s non-invasive, painless (usually no anesthetic is needed), and involves no cutting or stitches.
-
Important Note: This is primarily a screening test. If the results are abnormal or inconclusive, a traditional scalpel biopsy (D7286) is usually required for a definitive diagnosis. Think of it as an initial check.
D7288: Brush Biopsy – Transepithelial Sample Collection
You might notice this code is very similar to D7287, and you’d be right. In fact, D7288 was introduced to more specifically describe the collection of a transepithelial sample, which is essentially a more comprehensive brush biopsy.
-
The Difference: While D7287 might be seen as a simpler cell collection, D7288 specifically involves a brush that is designed to collect cells from all layers of the epithelium (the surface tissue). The goal is to get a broader and deeper sample of cells.
-
In Practice: Many dental offices and insurance plans may use these codes somewhat interchangeably for brush biopsy procedures, though D7288 is the more technically accurate code for the comprehensive brush technique often marketed as “OralCDx.” It’s still a non-invasive screening tool.
D0470: Tissue Examination by Pathologist
This is a crucial code, but it’s not for a procedure the dentist performs. Instead, it represents the professional service provided by the pathologist who examines the tissue you just had biopsied.
-
What it covers: This code covers the pathologist’s work: preparing the tissue sample, slicing it, staining it, examining it under a microscope, and interpreting the findings to render a final diagnosis. They then send a detailed report back to your dentist.
-
It’s a separate fee: You will often see this code listed separately from the surgical code (D7285, D7286). The surgical fee covers the dentist’s work in removing the tissue, and the D0470 fee covers the pathologist’s analysis. They are two distinct services provided by two different professionals.
Comparing the Common Biopsy Codes
To make it even clearer, here is a simple comparison table to help you distinguish between these codes at a glance.
| CDT Code | Procedure Name | Tissue Type | Method | Invasiveness |
|---|---|---|---|---|
| D7285 | Biopsy of Oral Tissue – Hard | Bone | Surgical incision into bone | High |
| D7286 | Biopsy of Oral Tissue – Soft | Soft Tissue (gums, tongue, etc.) | Scalpel incision (incisional or excisional) | Moderate |
| D7287 | Exfoliative Cytological Sample Collection | Surface Cells | Brush / Scrape | Minimal / None |
| D7288 | Brush Biopsy – Transepithelial Sample | All layers of surface cells | Specialized brush | Minimal / None |
| D0470 | Tissue Examination by Pathologist | Tissue Sample | Microscopic analysis | N/A (Lab Service) |
What Happens After the Procedure? The Pathologist’s Role (D0470)
You’ve had the biopsy, and now you’re waiting. What’s actually happening in the lab?
Once your dentist places the tissue sample in a preservative and sends it to the pathology lab, the process begins. This is where code D0470 comes into play. The pathologist, a medical professional with specialized training in diagnosing disease from tissue, will follow a series of steps:
-
Gross Examination: First, they look at the sample with the naked eye, describing its size, shape, and color. This is called the “gross description.”
-
Processing: The tissue is placed in a cassette and put through a process that removes water and replaces it with paraffin wax, creating a solid block.
-
Sectioning: Using a precise instrument called a microtome, the pathologist’s lab assistant (histotechnician) slices the wax block into incredibly thin sections, just a few cells thick.
-
Staining: These thin slices are placed on glass slides and stained with special dyes. The most common stain is H&E (Hematoxylin and Eosin), which colors different parts of the cells (nuclei, cytoplasm, connective tissue) to make them visible and distinguishable.
-
Microscopic Examination: The pathologist examines the stained slides under a microscope, looking at the architecture of the cells and individual cell characteristics. They determine if the cells are normal, inflamed, benign, or malignant.
-
Diagnosis and Report: The pathologist compiles their findings into a final report. This report includes the gross and microscopic descriptions and, most importantly, the final diagnosis. This document is sent back to your dentist, who will then go over the results with you.
The entire process from biopsy to final report typically takes anywhere from 3 to 10 business days.
The Financial Side: Insurance and Your Out-of-Pocket Costs
Let’s be honest: the “dental code for biopsy” isn’t just academic curiosity. It’s directly tied to the cost of your care. Understanding the codes can help you understand your bill and your insurance coverage.
Is a biopsy covered by dental insurance?
Generally, yes, a biopsy is considered a diagnostic procedure and is a covered benefit under most dental insurance plans. However, “covered” doesn’t always mean “free.” Here’s what influences your out-of-pocket cost:
-
Your Plan’s Specifics: You’ll need to check your plan’s details. Some plans cover diagnostic services at 100%, while others might apply them to your deductible first, and then cover them at a percentage (like 80%).
-
Type of Code: A simple brush biopsy (D7287/D7288) will have a lower fee than a complex surgical bone biopsy (D7285). Your cost is directly tied to the complexity of the code used.
-
Deductible: This is the amount you have to pay out-of-pocket each year before your insurance starts to pay. If you haven’t met your deductible, you’ll likely be responsible for the full cost of the biopsy until you do.
-
Coinsurance: This is your share of the cost after you’ve met your deductible. For example, if your plan has 20% coinsurance for major services, you will pay 20% of the allowed amount for the biopsy, and the insurance will pay 80%.
-
Annual Maximum: This is the total amount your insurance plan will pay for your care in a given year. The biopsy fee will count toward this maximum.
-
In-Network vs. Out-of-Network: Your out-of-pocket costs will be lower if you see a dentist who is in your insurance plan’s network, as they have pre-negotiated rates.
The Pathology Fee (D0470) and Medical Insurance
Here’s a crucial point that surprises many people: the pathology fee (D0470) is often not covered by dental insurance. Why? Because it’s a medical service provided by a pathologist in a medical laboratory. In many cases, this fee should be submitted to your medical insurance.
This is where communication with your dental office is key. A good dental office will help you navigate this. They may have you sign a form allowing them to send the pathology claim to your medical insurer. It’s a good idea to call both your dental and medical insurance providers before the procedure to understand how they handle this crossover. Ask:
-
“Does my dental plan cover the surgical biopsy codes (D7285, D7286) and at what percentage?”
-
“Does my dental plan cover the pathology code D0470?”
-
“If not, how do I submit the pathology claim to my medical insurance?”
A Friendly Guide to Your Biopsy Journey
Knowledge is power, but it can also be a comfort. To help you feel prepared, here is a step-by-step summary of what your journey might look like, from recommendation to resolution.
-
The Recommendation: Your dentist identifies an area of concern and explains why a biopsy is the best next step. This is your time to ask questions.
-
The Treatment Plan & Codes: The dental office provides a written treatment plan. You will see the specific codes (like D7286 and D0470) listed, along with the estimated fees for each.
-
Check with Insurance: This is a proactive step you can take. Call your insurance companies (dental and medical) with the codes to verify your coverage and estimated out-of-pocket costs.
-
Informed Consent: Before the procedure, your dentist will explain exactly what they are going to do, the risks, and the benefits. You will sign a consent form, indicating you understand and agree to the procedure.
-
The Procedure: The biopsy is performed in the dental chair, typically under local anesthesia.
-
The Wait: Your sample is sent to the pathologist. This waiting period can be anxious, so don’t hesitate to lean on your support system. Your dentist’s office can give you a general timeline for when to expect results.
-
The Results: Your dentist will call you to schedule a follow-up appointment or will call you directly with the results from the pathologist’s report (D0470). They will explain what the diagnosis means and discuss any necessary next steps.
-
The Bill: You’ll receive statements from both your dental office (for the surgery) and potentially from a separate pathology lab (for D0470). Having the codes will help you match the charges to the services received.
Frequently Asked Questions (FAQ)
Q: Will a biopsy hurt?
A: Your dentist will use a local anesthetic to numb the area completely, so you should not feel any sharp pain during the tissue removal. You may feel some pressure. After the anesthetic wears off, you can expect some mild discomfort, soreness, or swelling, similar to what you’d feel after a filling or extraction. Your dentist will provide post-operative instructions to manage this.
Q: How long does it take to get biopsy results?
A: It typically takes between 3 to 10 business days. The time depends on the complexity of the tissue, the lab’s workload, and shipping times. Your dentist’s office can give you a more specific estimate.
Q: What does it mean if my biopsy is “benign”?
A: This is great news. “Benign” means the lesion is not cancerous. It may be a harmless growth, a reaction to an irritant, or an inflammatory condition. Your dentist will still explain what it is and whether any treatment or monitoring is needed.
Q: What does it mean if my biopsy is “malignant”?
A: “Malignant” means that cancerous cells were found. While this is a serious diagnosis, knowing exactly what you are dealing with allows you to take swift, informed action. Your dentist will refer you to a specialist, such as an oral surgeon, a head and neck surgeon, or a medical oncologist, to discuss a treatment plan.
Q: Is a second opinion possible on the pathology?
A: Absolutely. You have the right to ask for your pathology slides to be sent to another pathologist for a second opinion. This is not uncommon, especially for more complex or serious diagnoses. If you wish to do this, inform your dentist, and they can facilitate the process.
Conclusion
Navigating the world of dental procedures and insurance codes can feel overwhelming, but you don’t need to become an expert—you just need a reliable guide. The “dental code for biopsy” isn’t a single, mysterious number but a set of specific codes (D7285, D7286, D7287, D7288, and D0470) that describe different aspects of the diagnostic process. Understanding the difference between a surgical soft tissue biopsy, a bone biopsy, a brush biopsy, and the pathologist’s analysis can transform a confusing bill into a clear story about your healthcare journey.
Remember, this information is a tool to help you ask better questions and feel more in control. Your dentist and their team are your best resources. Don’t hesitate to ask them to explain any code on your treatment plan. Being an informed and engaged participant in your oral health is the best thing you can do for yourself.
Disclaimer: This article is for informational purposes only and does not constitute medical or insurance advice. Always consult with your dental professional and insurance provider for guidance specific to your situation.
Additional Resource
For the most up-to-date information on dental procedure codes, you can visit the American Dental Association’s website dedicated to CDT coding:


