If you are considering replacing multiple missing teeth, you have likely heard the term “implant-supported bridge.” It is a fantastic, long-term solution that offers stability and comfort. But when you start looking at the treatment plan from your dentist, you might feel like you are reading a foreign language.
One of the most common codes that appears on these treatment plans is for the “abutment.”
Understanding the dental code implant supported bridge abutment is crucial. Why? Because this small piece of hardware is often a significant part of your overall cost. Knowing what it is, why it is billed separately, and how insurance views it can save you from unexpected bills and help you have a more informed conversation with your dental team.
In this guide, we will break down everything you need to know. We will look at the specific CDT (Current Dental Terminology) code, what it covers, how it differs from other codes, and what you should expect during your treatment journey.
Dental Code Implant Supported Bridge Abutment
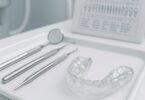
What Is an Implant-Supported Bridge?
Before we dive into the codes, let’s make sure we are all on the same page about the restoration itself.
A dental implant is a titanium or zirconia screw that replaces the root of a tooth. An implant-supported bridge is used when you are missing several teeth in a row. Instead of placing a single implant for every missing tooth, your dentist places implants at the ends of the gap. These implants act as anchors or pillars.
The bridge itself is a set of fake teeth (pontics) fused together. This bridge attaches to the implants.
There are three main components to this system:
-
The Implant Fixture: The part surgically placed into the jawbone.
-
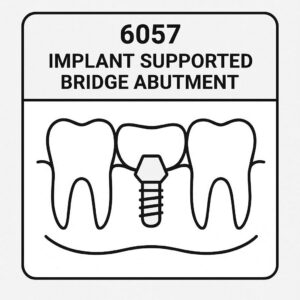
The Abutment: The connecting piece that screws into the implant and sticks up above the gum line.
-
The Prosthesis (Bridge): The final teeth that you see and use to chew.
Today, we are focusing on the middle piece: the abutment.
What Exactly Is an Abutment?
Imagine you are building a house. The implant is the concrete foundation. The abutment is the metal or ceramic post that connects the foundation to the roof (the bridge).
In simpler terms, the abutment is the interface. It is a small, custom-made or pre-fabricated connector. It attaches to the implant inside your gums and holds the final bridge in place.
There are two main types of abutments used in these cases:
-
Stock Abutments: These are pre-manufactured. They are often made of titanium. They are faster to use and usually less expensive, but they may not fit the gum contours perfectly.
-
Custom Abutments: These are fabricated in a dental lab specifically for your anatomy. They are designed to match the shape of your gums and ensure the bridge sits perfectly. These are often preferred for aesthetics, especially in the front of the mouth.
The Primary Dental Code: D6057
When you look at your dental insurance breakdown or treatment plan, you will likely see a line item labeled D6057.
According to the CDT (Current Dental Terminology) code set published by the American Dental Association (ADA), D6057 is defined as: “Custom fabricated abutment – includes placement.”
This is the code you will see most frequently when dealing with an implant-supported bridge abutment.
Breaking Down Code D6057
Let’s dissect what this code actually means:
-
Custom Fabricated: This indicates that the abutment is not a standard, “out-of-the-box” part. It is made specifically for your mouth. A dental laboratory uses impressions or digital scans of your implants and surrounding tissue to create an abutment that fits perfectly.
-
Includes Placement: This is a critical point for patients. When your dentist bills D6057, the fee usually covers both the manufacturing of the abutment and the clinical appointment time required to screw it into the implant.
When Is D6057 Used?
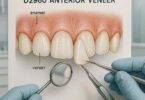
You will see this code used in cases where aesthetics and precise fit matter most. If you are getting a bridge to replace front teeth, your dentist will almost certainly use a custom abutment to ensure the gum line looks natural and there are no gray metal shadows showing through.
For a three-unit implant-supported bridge (two implants holding three teeth), you will typically see this code billed twice—once for each implant abutment.
Other Related Abutment Codes
While D6057 is the most common for custom abutments, it is not the only code. Dentists have options depending on the case complexity, the type of implant system used, and the final restoration. Understanding these differences can help you understand why your bill looks the way it does.
Here is a comparison of the most common abutment codes you might encounter.
| Code | Description | Typical Use Case | Cost Implication |
|---|---|---|---|
| D6057 | Custom fabricated abutment – includes placement | Used for custom esthetic cases, especially anterior (front) bridges. Allows for optimal emergence profile (natural gum shape). | Higher fee due to lab fabrication costs. |
| D6056 | Prefabricated abutment – includes placement | A standard, off-the-shelf abutment. Often used for posterior (back) teeth where esthetics are less critical. | Lower fee; no lab bill for custom work. |
| D6055 | Connecting bar – includes placement | Used when a bar is attached to multiple implants to support a removable overdenture or a fixed bridge. | Varies; often replaces individual abutments when a bar is used. |
| D6190 | Abutment supported retainer crown for implant abutment | This is actually for the crown or bridge that sits on top of the abutment. It is separate from the abutment code. | Billed per unit (tooth) of the bridge. |
A Note on “Unitary” vs. “Bridge” Codes
It is important to note that the abutment codes (D6056, D6057) are the same regardless of whether you are placing a single crown or a bridge. The code does not change just because the abutment is part of a bigger structure. The difference lies in the code for the restoration that goes on top of the abutment.
The Connection: Bridge Codes (D6060 – D6070)
You cannot discuss the abutment code without understanding the bridge codes that pair with it. After the abutment is placed, the next step is to place the actual bridge.
If you are looking at a treatment plan for an implant-supported bridge, you will likely see a combination like:
-
D6057 (Custom Abutment) x 2
-
D6060 or D6065 (Implant Supported Bridge)
The code for the bridge itself varies based on the materials used and the type of bridge.
-
D6065: Implant supported porcelain/ceramic bridge (two implants supporting a three-unit bridge). This is the most common code for a fixed, high-quality bridge.
-
D6060: Implant supported bridge (base metal). This is less common for anterior esthetics but used sometimes in the back.
The abutment connects the implant to the bridge. If your bill shows a bridge code but no abutment code, that usually indicates the bridge is “screw-retained” (attaches directly to the implant) or that the abutment is integrated into the bridge (a “one-piece” design), which is less common.
Why Is the Abutment Billed Separately?
One of the most common questions patients ask is: “If I am paying for the implant and the bridge, why do I have to pay extra for the abutment? Isn’t it just a little screw?”
It is a fair question. The reason the abutment is a separate line item comes down to the nature of dental treatment planning.
-
It is a Different Procedure: The implant placement is a surgical procedure. The abutment placement is a restorative procedure. Often, they are performed by different specialists. A surgeon places the implant, and a general dentist or prosthodontist places the abutment and the bridge. Since the work and expertise differ, they are billed separately.
-
It is a Separate Part: In manufacturing terms, the abutment is a distinct component. It is not included in the “box” with the implant. Dental laboratories charge separately for designing and milling custom abutments.
-
Insurance Limitations: Dental insurance is complicated. Most plans have a “missing tooth clause” or separate annual maximums for surgical and restorative procedures. Billing the abutment separately allows the dentist to accurately reflect the work done and align with insurance processing rules.
Insurance and the Abutment Code
Navigating insurance for implant dentistry can be frustrating. Implants are often considered a “major service,” and many traditional PPO plans were not designed with implant coverage in mind.
When it comes to code D6057, here is what you need to know:
The “Missing Tooth Clause”
Many older dental insurance plans have a clause that says they will not cover an implant to replace a tooth that was missing before the insurance policy started. If this is the case, they may deny coverage for the implant fixture and the abutment.
Frequency Limitations
Insurance companies often limit how often they will pay for an abutment. They typically consider it a once-per-implant-per-several-years procedure. Since an abutment is meant to last a long time, they will not usually pay for a replacement unless the old one is damaged.
Bundling
Some insurance companies try to “bundle” the abutment with the crown or bridge. They may say, “We cover the crown at 50%, but that includes the abutment.” However, because D6057 specifically says “includes placement,” and it is a distinct component, many dentists will argue that it should be considered separate from the crown/bridge code.
Important Note: Always ask your dentist’s office to send a pre-treatment estimate to your insurance company before you start. This estimate will break down exactly how they plan to bill D6057 and how much the insurance is likely to pay. This is the best way to avoid surprises.
Step-by-Step: The Process of Getting an Implant-Supported Bridge
To understand the role of the abutment (and its code), it helps to visualize the timeline of treatment.
Phase 1: Surgery
-
Procedure: The dental implants (fixtures) are placed into the jawbone.
-
Healing: You wait 3 to 6 months for the implants to fuse with the bone (osseointegration). During this time, the implants are usually buried under the gum.
Phase 2: Uncovery and Abutment Placement
-
Procedure: This is where code D6057 comes into play.
-
A small incision is made to expose the top of the implant.
-
The healing cap is removed.
-
The dentist takes an impression or digital scan of the implant position, the surrounding teeth, and the gum tissue.
-
A custom abutment is designed in a lab (or sometimes in-office) to fit the exact contours of your gum.
-
At a subsequent appointment, the custom abutment is torqued into the implant.
-
Cost Trigger: You are billed for the lab work and the placement appointment.
Phase 3: Bridge Fabrication
-
Procedure: Once the abutments are in place, the dentist takes a final impression of the abutments.
-
The lab fabricates the bridge to fit precisely onto the abutments.
-
You return to have the bridge cemented or screwed onto the abutments.
-
Cost Trigger: You are billed for the bridge code (e.g., D6065).
Custom vs. Prefabricated: Which Is Right for You?
When reviewing your treatment plan, you might see a choice or a recommendation between D6057 (custom) and D6056 (prefabricated). Here is how to evaluate which is better for your situation.
| Factor | Custom Abutment (D6057) | Prefabricated Abutment (D6056) |
|---|---|---|
| Aesthetics | Excellent. Designed to match gum shape and prevent metal shine-through. | Good for back teeth. Can show metal margins if gums recede. |
| Strength | Very strong. Made of titanium or zirconia. | Very strong. Standard titanium. |
| Time | Takes longer. Requires lab fabrication time (1-2 weeks). | Faster. Often available same-day if the implant is stable. |
| Cost | Higher due to lab fees and design time. | Lower. |
| Best For | Front teeth (anterior), thin gums, high smile lines. | Back teeth (posterior), thick gums, budget-conscious cases. |
A Quote from a Restorative Dentist
“I tell my patients to think of the abutment like a tailor-made suit versus a rack suit. For a front tooth bridge, you want a tailor-made suit. It fits the gums perfectly, and no one will ever know it is there. For a back molar, a rack suit works just fine; it’s durable and does the job without the extra expense.”
— Dr. Sarah Jenkins, Prosthodontist
Common Billing Scenarios for D6057
Let’s look at a few realistic scenarios to see how this code appears on a bill.
Scenario 1: Replacing Three Front Teeth
-
Missing: Teeth #7, #8, #9 (upper front).
-
Plan: Two implants (positions #7 and #9) supporting a three-unit bridge.
-
Treatment Plan:
-
D6010 (Implant placement) x 2
-
D6057 (Custom abutment) x 2
-
D6065 (Ceramic bridge) x 1
-
-
Reasoning: Because these are front teeth, custom abutments (D6057) are essential to ensure the porcelain bridge sits correctly and the gum tissue looks healthy and natural.
Scenario 2: Replacing Two Back Molars
-
Missing: Teeth #30 and #31 (lower right).
-
Plan: Two implants supporting a two-unit bridge (or a single crown and a cantilever, depending on the case).
-
Treatment Plan:
-
D6010 x 2
-
D6056 (Prefabricated abutment) x 2
-
D6060 (Base metal bridge) or D6065 (Ceramic bridge) x 1
-
-
Reasoning: Since this area is not visible when smiling, prefabricated abutments (D6056) are often used to save cost. The strength is the same, but the aesthetics are less critical.
Scenario 3: The Bar Attachment
-
Missing: All teeth on the lower arch.
-
Plan: Four to six implants supporting a “fixed-detachable” bridge (often called an All-on-X concept).
-
Treatment Plan:
-
D6010 x 4
-
D6055 (Connecting bar) x 1
-
D6114 (Implant supported fixed prosthesis) x 1
-
-
Reasoning: In this scenario, individual abutments are not used. Instead, a bar (D6055) connects all the implants, and the bridge clips onto the bar. Note: Some dentists may use multi-unit abutments instead of a bar, which would be billed under a modified code like D6057 or a specific implant system code.
Cost Considerations: What Are You Paying For?
Understanding the cost of code D6057 helps you see the value behind the code. While prices vary wildly based on geography and the dentist’s specialty, here is a general breakdown of where your money goes.
When you pay for a custom abutment (D6057), you are covering:
-
Impressions/Scanning: The time and technology used to capture the exact position of the implant.
-
Lab Fabrication: A dental ceramist designs the abutment digitally and mills it out of a solid block of titanium or zirconia.
-
Materials: High-grade, biocompatible metals or ceramics.
-
Clinical Placement: The dentist’s time, expertise, and overhead to place the abutment without damaging the implant threads (torque control).
Average Cost Range:
-
D6056 (Prefabricated): $300 – $600 per abutment
-
D6057 (Custom Fabricated): $600 – $1,200 per abutment
Note: These are dental office fees before insurance. If you have insurance, you will pay a percentage of this (usually 50% for major services) until you meet your annual maximum.
Frequently Asked Questions (FAQ)
1. Is the abutment permanent?
The abutment is designed to be a long-term part of your restoration. However, unlike the implant fixture, it can be removed or replaced if necessary (for example, if it loosens or if the bridge needs to be replaced years later). It is considered a permanent component but is technically retrievable.
2. Does insurance cover D6057?
It depends on your plan. Many plans classify it as a “major restorative” service and cover it at 50% after the deductible. However, if your plan excludes implants altogether, it will exclude the abutment. Always verify with a pre-treatment estimate.
3. What is the difference between D6056 and D6057?
D6056 is a prefabricated (stock) abutment. It is a standard part made by the implant manufacturer.
D6057 is a custom abutment. It is made specifically for your mouth by a dental lab to achieve a better fit and better aesthetics.
4. Can I use a prefabricated abutment for a bridge?
Yes. In the back of the mouth, where aesthetics are less of a concern, dentists often use prefabricated abutments (D6056) for bridges. They are strong and reliable. However, if the bridge is in the smile zone, a custom abutment is usually the better choice.
5. Why does my bill show D6057 twice?
If your treatment plan involves a bridge supported by two implants, you will need one abutment per implant. Therefore, the code D6057 (or D6056) will appear on your bill twice—once for each implant location.
6. Is there a warranty on the abutment?
Warranties vary by dentist and lab. Most reputable dentists will warranty the abutment and the bridge against manufacturing defects for a period of time (often 1-5 years). This does not typically cover damage from trauma, bruxism (teeth grinding), or poor oral hygiene.
Tips for Reviewing Your Treatment Plan
Before you sign on the dotted line, take these steps to ensure you understand the dental code implant supported bridge abutment section of your plan.
-
Ask for a Breakdown: Request that the treatment plan separates surgical fees (implants) from restorative fees (abutments and bridge). This helps you see exactly what you are paying for each phase.
-
Confirm the Code: Ask the billing coordinator, “Are we using D6056 or D6057?” If it is D6057, ask why. The answer should be related to esthetics or fit.
-
Check for the “Includes Placement” Note: The D6057 code is supposed to include the placement appointment. Ensure the office is not trying to bill an additional placement fee separately (e.g., D6011).
-
Verify with Insurance: Do not rely on verbal confirmations from the insurance call center. Ask your dentist’s office to submit a pre-treatment estimate (predetermination) to the insurance company. This gives you a written document outlining what the insurance will pay for each code.
The Importance of Quality Materials
When discussing the abutment code, it is worth noting that “custom” does not always mean “high quality” if the lab is subpar. However, in the context of code D6057, the expectation is that the abutment is fabricated to a high standard.
There are two primary materials used for custom abutments:
-
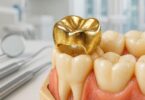
Titanium: The gold standard. It is incredibly strong, biocompatible, and bonds well with the implant. It is grey, so it can sometimes show through thin gums.
-
Zirconia: A white, ceramic material. It is nearly as strong as titanium but offers superior aesthetics because it looks like a natural tooth root. It is often preferred for custom abutments in the front of the mouth.
If you are receiving a custom abutment (D6057), do not hesitate to ask your dentist which material they are using and why it is appropriate for your specific case.
Conclusion
Navigating dental codes can feel overwhelming, especially when you are investing in a significant procedure like an implant-supported bridge. However, understanding the dental code implant supported bridge abutment—specifically D6057—empowers you to take control of your treatment plan.
To summarize:
-
The abutment is the critical connector between the implant and the bridge.
-
D6057 represents a custom-made abutment, often used for aesthetic excellence.
-
This code is typically billed per implant and is separate from the codes for the implant fixture and the final bridge.
-
Insurance coverage varies, but obtaining a pre-treatment estimate is your best tool for financial planning.
By asking the right questions and understanding the “why” behind the codes, you can work confidently with your dental team to restore your smile with a solution that is built to last.
Additional Resources
For further reading on dental implant terminology and insurance navigation, the American Academy of Implant Dentistry (AAID) offers a patient education section that explains the different types of implant restorations and the components involved.
-
Resource Link: American Academy of Implant Dentistry – Patient Resources
Disclaimer: This article is for informational purposes only and does not constitute medical, dental, or legal advice. Dental codes and insurance policies vary by provider and region. Always consult with your dentist and insurance carrier for accurate diagnosis and billing information.
Author: The Dental Clarity Team
Date: March 24, 2026